
Walls are like a blank canvass waiting for you to unleash your creativity. There are so many ways to design your walls but truth be told, nothing beats DIY designs. They serve as memories, especially for your kids, and they allow you to express your personality.
Looking for some creative and beautiful ideas? We have compiled several below. Enjoy!
I. Wall Hanging Crafts for Kids
Are you looking for some cool projects to enhance the creativity of your kids? Activities that you can do together? Or simply to keep them busy? If you answered yes, then you should let them do some paper crafts! Here are some exciting ideas that you might want to try out:
A. Egg Carton Flowers

You don’t have to throw your egg cartons after they are empty. You can design them with crafts with your kids! We’re going to guide you on how to make these pretty egg carton flowers that are ideal for display or even for gifts!
Here are the things you’ll need:
● Egg carton
● Acrylic paint
● Paper straw
● Glue
● Scissors
● Paintbrush
● Pom poms
● Paper plate
Instructions:
1. First, cut out the four containers from your egg carton. Trim the sides so they are rounder for the flower petals.
2. Squeeze some acrylic paint on a paper plate and have your children paint the flowers. Let your children’s imagination take into action and allow them to use whatever color they like. But, if you want, you can suggest pastel colors to make them prettier.
3. Once the children are done painting, allow the flowers to dry for a few minutes.
4. When they are completely dried, you can start attaching the paper straws by applying glue at the back. The straw will act as the stem of the flower.
5. Next, glue colored pom poms in the middle to complete the look of your egg carton flowers.
B. Family Memory Frame

If you are planning to go to the beach anytime soon, let your kids collect several rocks and shells. Take home some sand with you as well. You can use these to decorate your picture frame for your beach getaway memories.
Here are the other materials you will need:
● Glue
● Wooden picture frame
● Sponge brush
● String / Wire
Instructions:
1. Cover your frame with some glue. Make a thin layer and be careful not to put too much. You can achieve this by using a sponge brush.
2. Then, sprinkle some sand over the adhesive until you fully cover the picture frame. Allow it to dry for a few minutes.
3. Once the sand is glued securely to the frame, it’s time to stick the shells and rocks. Put some glue under the shells and rock and put them around the wooden frame. Allow it to dry for a few minutes.
4. For the last step, stick your string or wire behind your wooden frame so you can hang it on your wall.
And that’s it! Pretty simple, right? So easy and fast to do yet your memory frame will serve you for a really long time!
II. Wall Hanging Ideas for Classrooms
Decorating your classroom is a fun and productive way to keep the students involved. Instead of having the same old decorations, you can use your (and the students’) creativity by designing your bulleting board. Here are some awesome ideas that you might want to try out!
A. DIY Bulletin Boards
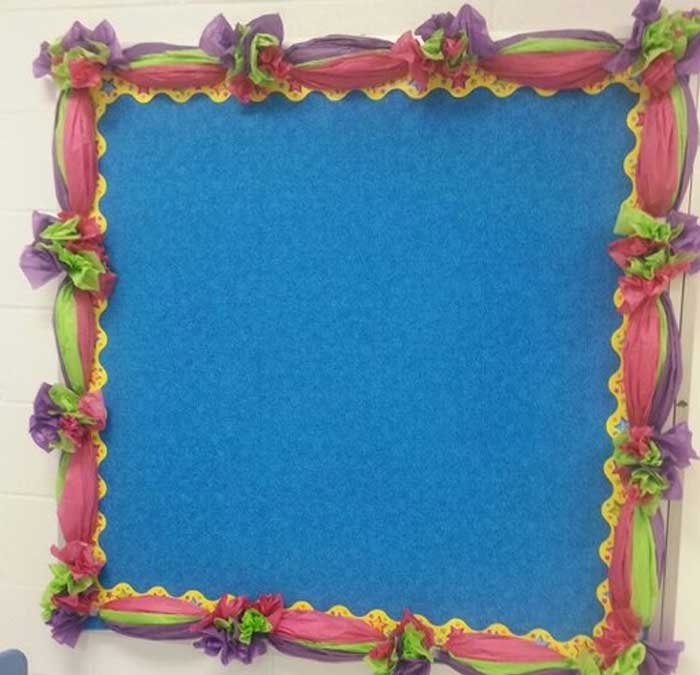
Bulletin boards are really common not just in classrooms, but in hallways as well. So, decorating them will help entice students. Not only that, designing them will help keep the aura of the classroom fun and lively.
Here’s a simple, yet attractive way to decorate your bulletin boards:
Materials needed:
● Tissue paper with different colors
● Stapler
● Scissors (in case you need to cut short the tissue paper)
Instructions:
1. Use one sheet of tissue, gather it, and hold it somewhere in the middle to shape it like a fan.
2. Then, slide your hand all the way down until you are holding the opposite end. The tissue should look like a tube now with two fan edges.
3. Repeat the first two steps for the remaining pieces of tissue paper. We recommend that you use at least three colors to make the borders stand out.
4. After doing the steps to all your sheets, group the three colors together.
5. With the fan edge sticking out, staple the sheets to your bulletin board. It’s better you start stapling at the top to position the borders better. Then, staple the edge at the bottom as well.
6. Fluff the edges out so that they look like flowers. This will also hide the stapled parts.
7. Stape the next bundles and make sure that they touch those that are already stapled. This will create larger flowers.
8. Do this until you have borders all around the sides of the board.
B. Sunflower Wall Art
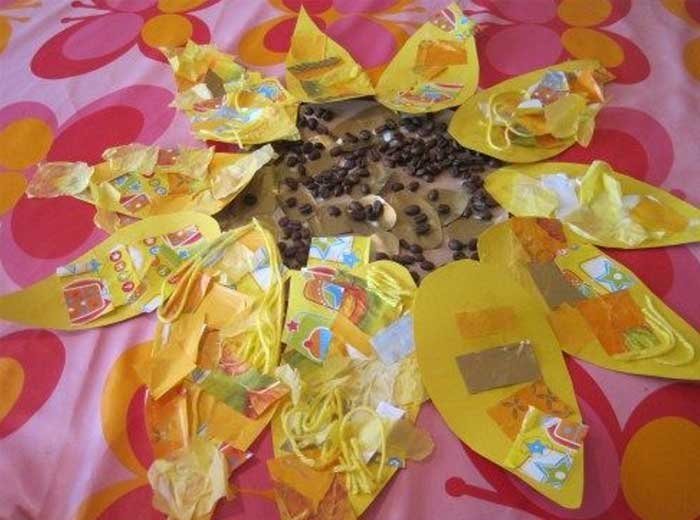
Doing a sunflower wall art is perfect for toddlers and young children. Aside from using their imagination and creativity, this activity enhances their motor skills! To conduct this activity, here are the things you need to do:
Materials needed:
● Sheets of white paper
● Glue
● Sunflower seeds
● Large black paper for the center of the flowers
● Brayers
● Orange and yellow paint
● Paintbrushes for the children
Instructions:
1. First, cut out a big circle from the black paper and apply glue all over it.
2. After, sprinkle sunflower seeds right away and let it dry for a few minutes.
3. Cut the white paper into large petals that will fit the big black circle you did in step 1.
4. Now, let the children color the petals with orange and yellow paint. If they want, they can also mix both colors for a different shade.
5. When they are done, allow the petals to dry completely.
6. Once the petals are fully dry, it’s time to assemble the sunflower. Glue first the black circle at the center of your bulletin board.
7. Then, put glue beneath the petals and let the children attach the petals around the black circle.
III. DIY Hanging Decorations for Bedrooms
Among the best DIY wall hanging ideas are those that are found in bedrooms. If you are looking for cool ways to brighten up your room, we have some ideas for you.
A. Art Piece Using Tree Branches
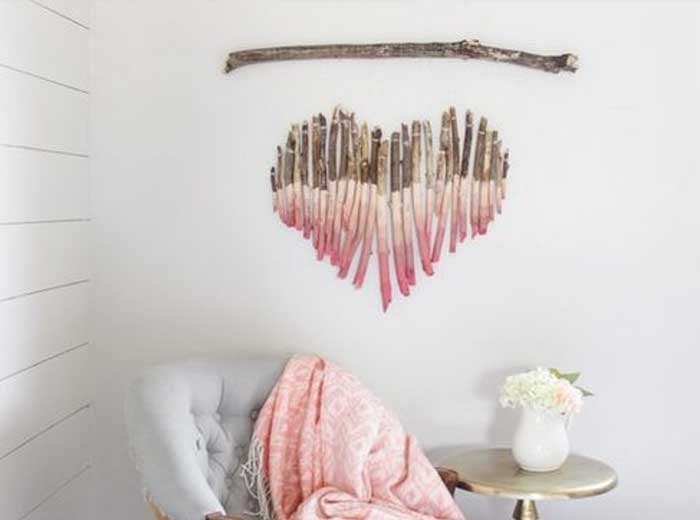
If you are into nature, then you would want this DIY hanging decor in your room. It is really simple to do but will surely make your room more attractive.
Materials needed:
● Black marker
● Cardboard that is about 2.5 ft long and 2 ft high
● A pair of pliers
● 25 short branches, 18 inches long and 1-inch diameter
● Nylon thread
● Craft paint, 4 different shades
● A large branch, 2.5 ft long and 2-3 inches long
Instructions:
1. Clean the tree branches with water to remove dirt, mud, and other debris. Allow them to dry completely.
2. On your piece of cardboard, draw the template of your project. Use a pencil and draw a huge heart or any shape you prefer. Then, with your marker, draw over the shape for better visibility.
3. Put tree branches over the shape. It’s better if you pick the thickest branch and lay it over at the center. The branches should be horizontal so you can arrange them better with the corresponding height allowance.
If some of the branches are too long, put them in their position and mark the branch with your marker. You can then cut the excess using your pair of pliers.
4. After positioning the branches, it’s time to color them. When painting, the only limit is your imagination. If you want to integrate different shades of one color or you want to incorporate different colors, it’s all up to you.
5. Leave them for some time and make sure that all branches are completely dry.
6. After leaving them to dry, it’s time to tie them on your hanging branch. Put nylon strings on your small branches. One by one, connect them to the larger branch. Adjust the space how you like them.
7. After following the steps, you can now hang your tree branch art in your room!
B. Wall Hanging Seashell Decor
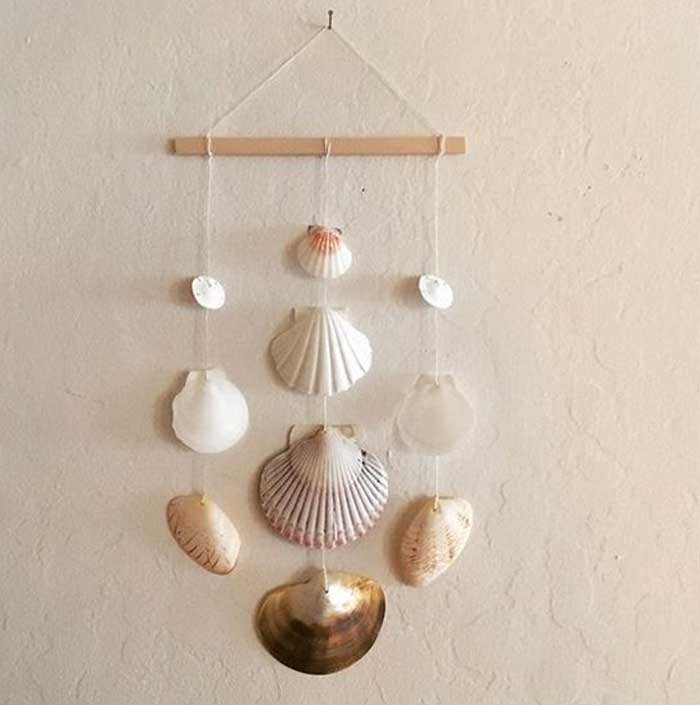
If you are a beach lover, what better way to decorate your room than some seashell designs? When you go to the beach, collect some seashells and rocks. If you’re not near the beach, you can purchase shells from local stores and even online like Amazon. Here’s how to make a seashell decor for your bedroom wall:
Materials needed:
● At least a dozen of seashells and rocks
● Glue gun
● Wooden dowel
● Jute rope
Instructions:
1. Soak the seashells with chlorine first if they are from the beach. Then, soak them again but this time, with soapy water. This is to remove any residue of the bleach.
2. With the wooden dowel, apply hot glue on one side. Then wrap the rope to cover the dowel.
3. Do step 2 until the wooden dowel is covered with the rope. Apply more glue on the edges to further secure the rope.
4. Tie a piece of rope at each end of the dowel. These will be used to hang your decor on the wall.
5. Tie again 4 pieces of jute rope on the dowel and spread them evenly. If you have large shells, you can make the second and fourth rope longer so the shells won’t look congested.
6. Glue the shells to the ropes and do your best to space them as evenly as possible. You can glue the larger shells first and as you go down, the shells become smaller or you can do the reverse.
7. Allow them to dry.
So there you have it! Hopefully, you had fun reading this post about wall hanging ideas! Remember, whatever DIY wall project you are going for, always apply your creativity and imagination!